 Techniques : To get professional results does not require professional equipment. But it does require a stable assistant. Someone that is always there, helping you hold your camera steady. Someone that won't flinch when the wolves in Yellowstone sound their magnificent song. Someone that doesn't mind staying out all night, holding your camera pointed at the stars. Someone that won't complain when you ask them to put their feet in the freezing mountain stream and hold your camera steady for a second or two, long enough to expose the water in motion. Someone that, well, let's face it. There is no such person. That's why we use a tripod. There are different sorts of tripods. By its name (tri meaning three and pod meaning foot) you would expect a tripod to have three legs. And most of them do. Some are made from different materials. But no matter what type of tripod you have, as long as you use one your pictures should improve. John Shaw - a well-recognized name in nature photography - calls a tripod a "crucial accessory" in his book, "The Nature Photographer's Complete Guide to Professional Field Techniques". In it he states: If you want to improve the quality of your photographs the best single accessory you can buy is a sturdy, well-made tripod. Every working professional nature photographer shoots every exposure possible with his or her camera mounted on a tripod.John Fielder in his book, "Photographing the Landscape: The Art of Seeing", writes: You can make good photographs while hand-holding the camera, but you won't achieve excellence. A tripod and cable release of the shutter are as important to the landscape photographer as the shovel is to a ditch digger.He goes on to say that tripods come in two forms, which he describes as "light and worthless" or "heavy and useful". More on this in a moment. Our first tripod was an inexpensive Velbon tripod. It was a loaner from a friend, and we essentially wore it out. Fortunately we have a very understanding friend. (Thanks, Matt.) Why did we use it? Because there were pictures that we wanted to take that you cannot really take without a tripod.
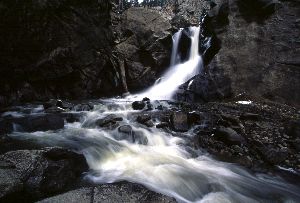
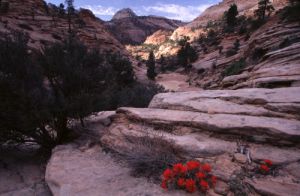
The picture in Figure 1 shows what is called a slip effect. For more specific details about this shot you might want to read our Focus on Water article found elsewhere on this site. The bottom line is that this film was exposed for about a half of a second to get this effect. If you absolutely had to hold still for a half a second, it would be very difficult to do. How many times does your heart beat in that time frame? Even if it only beats once, that subtle ebb and flow of blood through your hands and fingers is enough to move the camera that you are supposed to be holding rock steady. There is a standard rule of thumb that says something like this: You can produce a quality picture without using a tripod as long as your exposure is 1 / lens focal length seconds or faster.What does this mean? It means that if you have a 50mm lens, you can try to get by without a tripod as long as your exposure is 1/50th of a second or faster. That doesn't sound so bad. But what about those larger lenses? Ignoring the fact for the moment that you aren't likely to try taking a picture with a 500mm lens without a tripod to begin with, this standard "rule" says that your exposure has to be 1/500th of a second (or faster) before you can even try. If your lens is small enough to be held by hand, it is probably not the fastest lens. That means that you have to use fast film to compensate. And fast film does not generally have the quality that slower film does. It's all about compromise. Faster lenses are larger and cannot easily be held, while smaller lenses that can be held are slower. Slower film provides better picture quality but requires longer exposures. In an ideal world we would have access to 500mm lenses that weigh 6 ounces, but that hasn't happened yet. But is exposure all about film speed and lens capabilities? No, as a matter of fact, it is not. There is also "depth of field" to consider. This could be the topic for an entire technical article all by itself. For now, we will summarize by saying: The longer the exposure, the more depth to your photograph. What does this mean? It means that to capture shots with foreground-to-background focus like the one shown here, you have to have a longer exposure even with a small and fast wide angle lens. So it's not just larger lenses that require a tripod. Finally, there is the theme for this web site: Moments of Light. Many of the most dramatic moments occur around sunrise or sunset. During these times, there is much less available light. The amount of light also affects the exposure (along with film speed and lens speed). With fast film and a fast lens the amount of light required is lower. But with lower levels of light, it still takes longer to capture the proper amount of light on film. To capture these quintessential moments really requires a tripod. Our Equipment Evolution We now own three different tripods, and you can read more about our equipment if you like. But more important than the actual equipment, we think, is the fact that we actually use a tripod. But what if you don't have one? What if you are backpacking where every ounce is critical? Here are some other alternatives that you can consider. Alternatives If you are camping and bring along a bag of beans or rice, it can make a nice pillow for your camera or large lens until you eat it. Even a rolled up shirt placed on a log or rock can help. Both of these alternatives work best if you also use a cable shutter release. A monopod is essentially a walking stick with a camera mount on top. It has the advantage of being something that you can use for a purpose other than a camera support. But it would probably be best to not have your camera attached while you are hiking. Some companies sell spikes that can be used for photographing low objects like flowers or insects. Imagine a tent spike with a camera mount point and you're not too far off. This is an excellent alternative but has a very specialized use. You probably would not want to use one of these for landscape or wildlife photography. A tripod is great when you are hiking. But what if you're somewhere where walking is not allowed? If you are planning a trip through a wildlife refuge, you might want to consider a window-pod, or window mount. This is a clamp that fits over the glass of a partially rolled-down window in your vehicle. You can accomplish something similar by placing a towel or old sweatshirt over the glass and resting your camera or lens on that, but the window-pod looks better. |
Trips
Themes
Gallery
Techniques
Blog
Site Map
Search
Further Reading

